Step-by-step guide to your changing routine.
One of the first things you’ll learn after your stoma surgery is how to change your bag, which can also be called
a stoma pouch or stoma appliance. It’s important not to rush this process, especially in the early days when you’re finding your feet. Take your time to make sure you have everything to hand.
What do I need to change my stoma bag?
Many people choose to change their bags in the bathroom, but as long as you have the right equipment and a clean, quiet space, there’s no reason you can’t change your bag anywhere.
- New stoma bag
- A pair of scissors, unless stoma pouches have been pre cut
- Cleaning wipes
- Warm water
- Rubbish bag
- Adhesive remover (if you’ve chosen to use it)
- Any other accessories that your stoma nurse has recommended
Steps to changing your stoma bag
Step 1
Gently remove your old pouch. You many have chosen to use an adhesive remover at this stage.
Clean around the stoma with lukewarm water and wipes and pat dry
Step 2
Use the supplied template to measure your stoma. Cut the flange on your stoma bag to the corresponding
size using ostomy scissors. Your stoma care nurse will probably have cut some pouches to size for you in the first week or two, after that, if you are receiving pouches from a delivery company, they can pre-cut the pouches
for you. If not, your stoma care nurse will show you the best way to cut the pouches to the correct size.
Step 3
Apply any barrier spray, pastes or gels, if you have been advised to use them.
Step 4
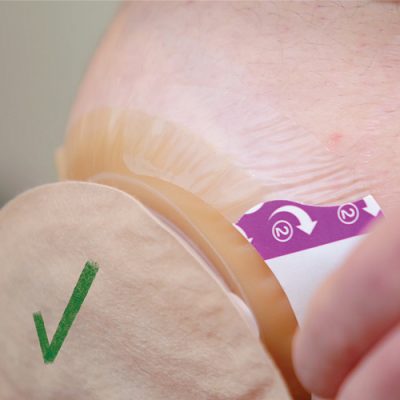
Remove the protective cover from the flange and fit the bag over the stoma.
Smooth the edges to make sure there are no creases.
Step 5
Dispose of your used stoma bag in the waste bags provided, they can then go into normal household waste.